How to Find and Understand Your Zoom Settings Zoom settings, creating Zoom meetings, and best practices
February 8, 2022
Zoom offers an array of meeting options that enable us to conduct online classes and meetings, hold virtual office hours, and much more. It also provides a lot of settings options. In this blog, we will discuss how to access your Zoom meeting settings, how to create meetings, and share a few best practices.
Zoom settings
There are two levels of settings in Zoom, meeting settings and account settings. The meeting settings only affect individual meetings or recurring meetings. However, the account settings affect every meeting you create with your Zoom account. Also, account settings typically outweigh the individual meeting settings.

Once you are in the Zoom settings area, we recommend adjusting your Waiting Room and Recording settings to ensure they adhere to your needs.
The default Waiting Room setting allows anyone who is signed in to their Chapman Zoom account to bypass the Waiting Room. So if you are looking to add an additional layer of security (for example, for office hours), please click on the “Edit Options” under Waiting Room and change that option to “everyone”:

The Recording settings allow you to change your local recording and cloud recording settings, save closed captioning, save audio transcripts, and many more:

Creating Zoom meetings
There are several different ways to create Zoom meetings. The two options that we recommend are creating Zoom meetings on Canvas (for instructors) or creating Zoom meetings directly on chapman.zoom.us.
It is important to note any meetings created on Canvas will also be accessible by all of the Canvas course participants. Additionally, Canvas will add those meetings to its calendar area. If you are creating Zoom meetings for your classes, this is the easiest way to share the link with your students. However, if you want to create a meeting for only a few students, please create your meetings on chapman.zoom.us instead.
Creating Zoom meetings on Canvas:
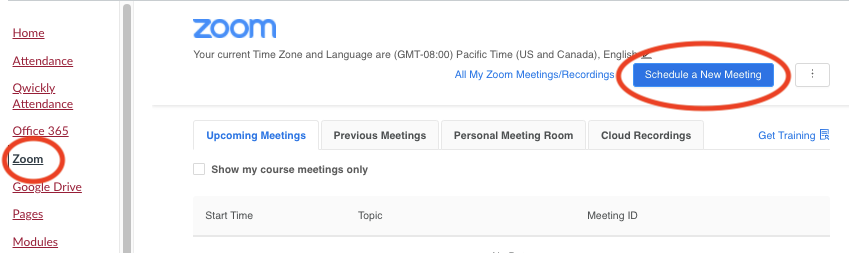
Go to canvas.chapman.edu sign in with your Chapman credentials, select your course, and click on Zoom in the left navigation bar to start the meeting creation process. If you don’t see Zoom, go to your course navigation settings to add it to your course.

Whether you create your Zoom meetings on Canvas or directly on Zoom’s website, Zoom will require that you enable the Waiting Room or add a Passcode to your meetings for security reasons. We know some of you like to enable the “Require authentication to join” setting. Please note that enabling this feature will only admit those users who are signed in with their Chapman Zoom accounts into your meeting. So, if any of your participants (students, guests, others) are signed in with a non-Chapman affiliated Zoom account, they will not be able to access your meeting. Therefore, we do not recommend this feature.
Finally, make sure your Zoom client is always up to date.
Additional resources:
- Settings and Configurations for Zoom Meetings
- Zoom Prime Room Features
- Zoom Learning Center
- Upgrading Zoom
If you have additional questions, please email edutech@chapman.edu.