Using your Zoom-enabled classroom Allow students to join synchronously or record a lecture for later viewing
September 10, 2021
Steps for creating a Zoom link for students to either attend a class synchronously or for you to make a recording of a classroom presentation or lecture for later viewing.
Direction from Provost Bouchard:
1. Singling out students this way could reveal the identity of the isolating students
2. Instructors will then need to manage expectations of additional students requesting HyFlex alternatives versus in-person attendance.
Note: HyFlex (defined as a hybrid class, with students face-to-face working alongside students on Zoom) Zoom/live streaming is not allowed as a means to convert face-to-face instruction into remote and/or hybrid learning for students or for instructors who are required to isolate or quarantine.
Create the Zoom link
First, you need a Zoom link to share. This link can be created in either Canvas (canvas.chapman.edu) or in Zoom (chapman.zoom.us). Some instructors have found it best to create a recurring meeting link with no fixed time and give it a specific meeting name such as, “Zoom link for use with permission”. This gives you a perpetual link to use in your course whenever you need it and also lets you record to the cloud and sync that recording seamlessly to the Zoom tab in your Canvas course.
Look up your classroom and find out what kind of Zoom-enabled classroom you have
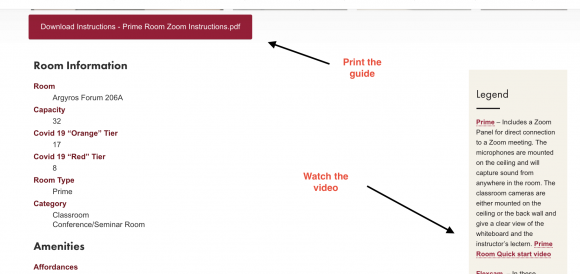
There are three kinds of Zoom-enabled classrooms: Prime, Connect, and Flexcam. Look up your classroom on the Classrooms Webpage. Search your classroom and then follow the instructions provided on the “Quick-Start Guides.”
Once you know what kind of room you have you can view the Classroom Quick-Start Videos for more tips on how to quickly get started in the classroom.
Share the Zoom link with your students
If you create the Zoom link in Canvas it’s easy to share with your students from the Zoom tab. Otherwise, you would have to copy/paste the link from chapman.zoom.us and share it some other way, such as in an Announcement, Message, or email to your student(s). Put that meeting ID someplace handy where you will have easy access to it when starting Zoom for your class. You will need the link and/or the meeting ID to start the meeting. This is another benefit to creating it in Canvas — it’s easy for everyone to find the link and the meeting ID in the Zoom tab.
Start the meeting in your class
Follow the instructions for either a Prime, Connect, or Flexcam classroom to start your meeting. Be sure to use the same meeting ID you previously created. I recommend you check the Participants panel and make sure you are the Host of your meeting (if the room starts the meeting, the room will default as the Host). It’s easy to change the host of the meeting from within the Participants panel. Make yourself the Host and make the room the Co-host.
Remember to stop the recording at the end of class, end the Zoom meeting, and log out of the computer.
Share the recording
Depending on how long your recording is, it may take some time to process. The video usually processes first, and then the audio and audio transcript take longer to process. This can take several hours! Once the recording is ready you can make it available to your students by publishing the recording.
If you used Canvas, publishing is easy. In the Zoom tab go to the Cloud Recording tab and then publish the recording.
If you created the meeting at chapman.zoom.us you will have to retrieve the link in the recordings tab of chapman.zoom.us. Use the sharing button to copy/paste the link and share it some other way, such as in an Announcement, Message, or email to your student(s).
Need some training or assistance? We have several options!
- Register for upcoming training.
- Schedule a Classroom Tech Assist via Bookings — see the ETS Linktree for the link


